 |
| ACL Editor | ||||||||||||||||||||
| Step 2. Modification of form from example 7 | ||||||||||||||||||||
|
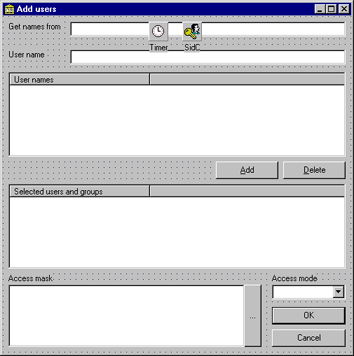
This step does not include actions specific to SvCom and all of these actions were illustrated in the previous example. So you could skip this step and use ready form from SvComEx8.zip. If you wish to do all changes by yourself then continue with this step. All necessary changes are described below. As you remember this form was able to obtain the SID of user using two ways: from the user name explicitly given via two TEdits and from the list of well-known SIDs. After this step this form will be used to select a list of users with access mask and access mode. At first, let's change the controls that lie on the form. Copy the project created in the previous example and do the following with it`s form:
Now is the time to set controls properties and add necessary code to it. Do the following:
Let's now implement main features of this form Button 'Add' operation: add users to the selection list. Selected users will be stored in the lower ListView. The upper list view with well-known users will be used as a source of the selection if more then one list item is selected. In other case the user specified in the EdDomain\EdUserName will be added to the selection. The code that implements this behaviour looks like this one:
It is a good idea to test this code immediately. Compile our example and run it. Try to select several items from the list with well-known SIDs and press the 'Add' button. You should see that all selected items are added to the lower list view. Try to do it several times. Then, try to specify user in the edits and press the 'Add' button. The user will be added to the list too. May be you already note that our code has one defect: the same user can be added to the selection many times. It is not good but it will not affect the behaviour of our example while it takes some time to eliminate this problem. So let's continue. One more useful feature is to add items to selection when user double clicks the list view.
OK, we can add items to the selection. Obviously we should be able to delete items from selections. Let's add the code to the 'Delete' button.
You can test our example again and you should be able to add and delete items to/from selection. Obviously the 'Delete' button can be used when there are marked items in the selection list view. Let's add the code that will allow or disable the 'Delete' when necessary. In addition we shall care about 'OK' button. Of course this button should be disabled when the selection is empty. Add the OnChange event handler to the selection list view:
The last portion of this code means that 'OK' button is enabled when AccessMode is specified. This code should be called when user changes the access mode. So add OnChange handler to the ComboBox:
So far so good. At this point all code that handles the users list finishes. Now we should implement two things only: access mask and access mode. Probably you know that access mask is a 32bit integer and each bit of it is used to allow or deny specific access. When application tries to receive access to the resource it says to Windows what access is necessary. In other words it passes the access mask to Windows. Each set bit of this mask is compared with masks that corresponds to the account (SID) of application. If bit is set it then Windows looks on access mode parameter to determine whether access is explicitly granted or denied. If access is denied the application does not receive access to object. The error 5 (Access Denied) occurs. If access is granted to one bit of desired access Windows continues to iterate through ACL until access is denied (Error 5) or all bits of access are allowed or the ACL finishes. In the last case the Error 5 occurs. There are two access modes that allow access: GRANT_ACCESS and SET_ACCESS and there are two modes that deny access: REVOKE_ACCESS and DENY_ACCESS. When you get EXPLICIT_ACCESS entries from the ACL they contain only SET_ACCESS and REVOKE_ACCESS modes. Two other modes are used for editing of ACL using EXPLICIT_ACCESS entries. The difference between them is in that the GRANT_ACCESS and DENY_ACCESS modes combine entries while SET_ACCESS and REVORE_ACCESS discard any previously specified access entries for given SID. Our form will allow to select necessary access mask and access mode easily. To implement it add the following code to the form:
Do not forget to add function to the form declaration:
Now is a time to implement the AccessMode property:
The final modification described below requires some comments. We are going to implement OnClick handler of the BnEditAccessMask button. This button will show Access Mask Editor dialog. This dialog will be created on the step 3 of this example only so you will not be able to test this code immediately. Simply write it:
The work of this code is simple: get current value of AccessMask and edit it. If edition was successful then save the new value and release the editor form in any case. The access editor form will be stored in the file fmFileRights so do not forget to add it to the uses clause.
Ok, now all changes in this form are committed and we are ready to create the Access Editor Form. Let's continue. |
||||||||||||||||||||
| << | Index | Step 1 | Step 2 | Step 3 | Step 4 | Step 5 | >> | ||||||||||||||||||||
| Add your comment | Read comments |
|
|
© 1998-2001
Alexey Dynnikov |
|